
Spars
When I first picked up the plans I thought I'd never be able to build the main spar for the Falco. It went around and around in my head for a long time until I finally figured out a way that
would work for me. I started early one month and about four weeks later it was built. After all the planning there was nothing to it.
How did I elect to do it ?? I started with an 8m long workbench and drew the exact outline of the spar on the table. To that I screwed some angled aluminium to which I could clamp the spar caps
as I laminated them. Then I made some special clamps out of wood which had bolts top and bottom at even intervals which would clamp the spar caps evenly while the glue dried. With all this set up
I started laminating the spar caps.

This is the top spar cap in my laminating jig. Note the special clamps with the bolts holding it all while the glue dries. Don't over-tighten the bolts or the clamping wood distorts. I used an electric drill/screwdriver with the torque setting for speed and to avoid over-tightening.

Next I needed to taper the spar-caps. For this I made a machine from aluminium angle and made a slide for my router. This was a very slow task and everything had to be checked many times but the results were very pleasing and the finish the router made was very nice and very accurate. After a light sand it was ready to be glued together in the jig.
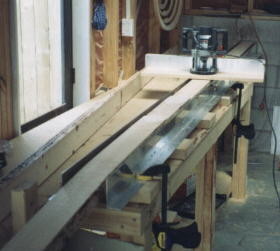
The alloy channel is clamped in place at the correct angle. The router slide needed stops to prevent the cutter from hitting the alloy.... I learnt the hard way !!!
I used a short pieces of channel screwed in for this operation since the main spar is tapered in steps, not a continuous taper.
The wood was attached into the machine by putting masking tape onto the machine and onto the spar then using small dabs of 5 min epoxy and weighted down until it dries. Don't use too much glue or you will never get it out !!

The jig I used to glue it all together was my 8m long table with the alloy screwed back in place. While accuracy was important, it was certainly the easiest part of the whole spar building process.
After tapering in both directions and gluing on the rear shear-web, This was the result. Very satisfying.
Next I felt the need to build something that looked like it belonged to an aeroplane.... The Tail.