
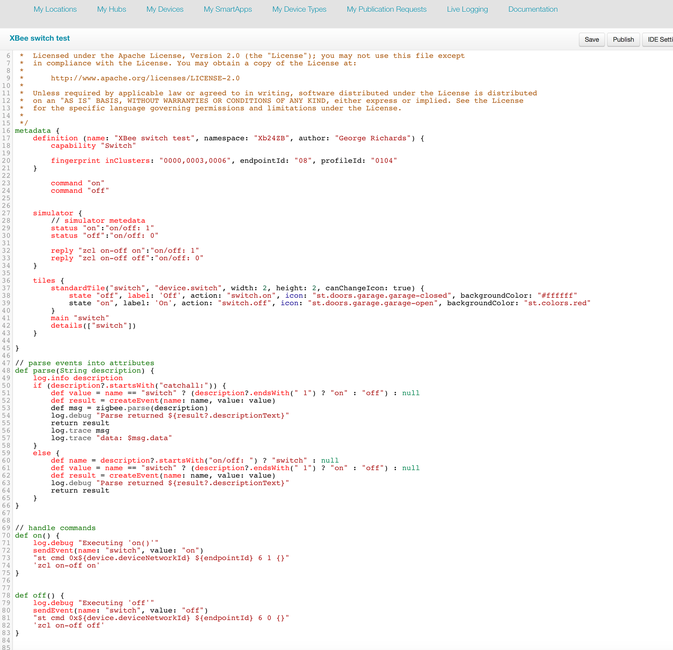
Connecting an Xbee 24ZB to Smartthings Hub
I recently got into smart things. The hub isn't approved in New Zealand as the Zwave frequency doesn't match the stupid choice of New Zealand's spectrum. I decided I wouldn't buy any Zwave gear and stick to Zigbee that uses 2.4 Gig.
I want to make a few of my own "Things" so I decided to buy the Smartthings Maker board. WhenI went to buy some, there were none available to buy so since I had a couple of Xbees on my desk I figured I'd use them instead.
The ones I have are NOT Pro models.
I'd read a lot of conflicting "advice" as to whether this was possible. I couldn't see why it wouldn't be so I decided to go and find out.
So where to start.
The first thing is to get the Xbee setup to talk to the Hub.
There are a lot of settings that need to be set correctly so I did a bit of experimentation. In fact it didn't take long to get the Xbee connected but it was without using encryption which wasn't desirable so I needed a little help.
I found a blog of someone connecting a Propeller board via Zigbee Pro so I used his security settings for my Non-PRO Xbee
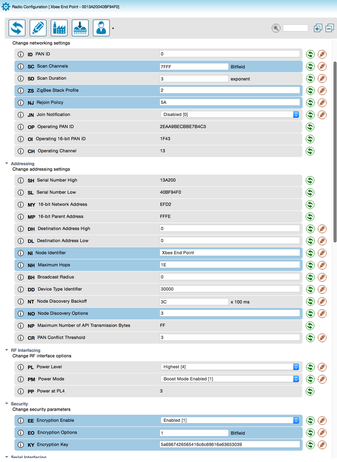
There are a few key aspects to the setup. (Using XCTU of course)
I used the Zigbee Endpoint API firmware. The endpoint firmware allows you to use power saving if that becomes desirable.
The API is the only mode to allow you to use the explicit addressing mode to send Zigbee packets AND to pass the ZDO requests through otherwise we won't see them. A0 must be set to 3.
We need the AO setting to allow us to receive the Zigbee explicit commands.
I've put my profile below to download for a look. It was an early setup but I don't think there are any deal breakers.
EDIT ** Since writing this it has become impossible to set "no sleep" so I recommend setting the sleep function to "pin hibernate" and tie pin 9 of the XBee to ground to stop it going to sleep and frustrating everyone!
Another important thing that can frustrate the heck out of you is that the encryption key (KY) MUST be set to the Zigbee default, which is ...
KY = 5A6967426565416C6C69616E63653039
Without that set correctly, you won't connect.
OK so now what?
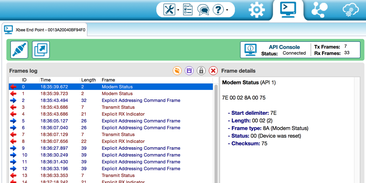
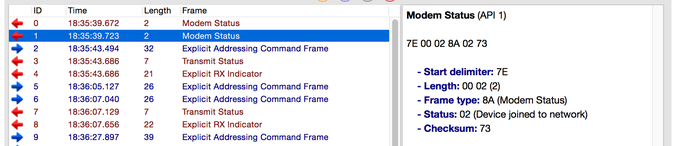
Using The XCTU in console mode with the Xbee plugged in (don't forget to push the connect button) press the reset button on the Xbee USB explorer card.
You should get a modem status returned that says the modem was reset.
Now you need to go into Smartthings app and click on add device/ add new device. This allows network discovery.
After a few moments you should get another Modem Status message. This time it should say Device joined Network.
Its important to note at this stage that SmartThings won't report that a device attached.
What has happened is that the Xbee has joined the network and has received PAN ID's and a local 16 bit address.
In order for the App to see a device it needs to see an endpoint. That part is up to us so lets get on with it.
In order for us to send the required messages to the hub we need to find out our addresses. We do this by having a look back at the configuration page.

Find the MY setting and tap the refresh button to get the current setting.
this is now the 16 bit address. Write it down.
The SH and SL settings also need to be written down. Together they form the 64 bit address. If either of those two fields have less than four bytes of data, they need leading zeros.
In this example the 16 bit address is EF D2
and the 64 bit address is 00 13 A2 00 40 BF 94 F8
We will need these.
Go back to the Console
Announce the Device
Now what we need to do is announce to the Hub that we are here. This will then send the hub into its discovery mode to try to find out who and what is doing the talking.
From here on we will be using the explicit addressing mode to send out Zigbee frames. Its not so user friendly but its what we've got.
So lets build new command. Click on the + in the Send Frames area.
Type in a meaningful name in the frame name box, like 'Device Announce'
and select ' Create Frame using frame generator tool'
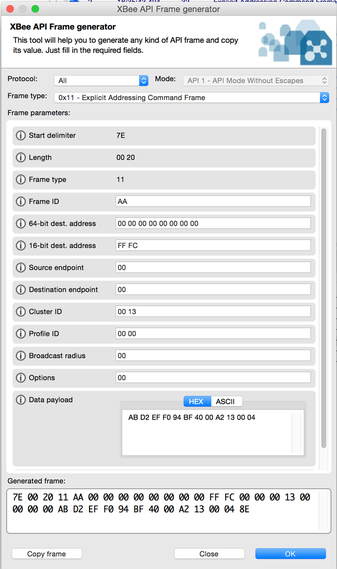
Select Frame Type for Explicit Addressing.
Frame ID: anything for now
64 bit Dest: All zeros to address the coordinator
16 bit Addr: Several options but I like FF FC for the coordinator
Source and Dest endpoints are zero since this is a base ZDO command
Cluster ID: 00 13. This is the Device Announce command.
etc.
Now the payload.
AB: It just a frame ID which is a transaction sequence number. Anything is OK
D2 EF: Thats our 16 bit address in Little Endian format.
The next 8 bytes is our 64 Bit address, again little endian.
Finally 04: This is the capability.Lets not get too bogged down. This just says the receiver is on.
Save the frame and send it.
You should get a transmit status message back saying success and it should be followed by an Explicit receive indicator from the Hub.
In response to the Device announce, the SmartThings hub will begin its fingerprinting by returning an Active Endpoints request to see what endpoints are on the announcing device.
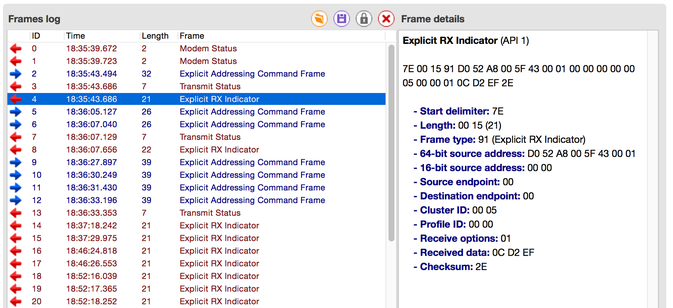
Looking at the message above we can see the cluster ID of 00 05, which is an Active endpoints request. If we look at the received data in the frame in this example, we can see 0C which is a frame ID (we need to reply with this) and our 16 bit address in little endian again. All good stuff.
Reporting the endpoints.
So now we need to reply buy sending an Active Endpoints Response message.
for this test we will only advise one endpoint but you can add plenty if you wish.
Make a new frame to send of the Explicit Addressing type.
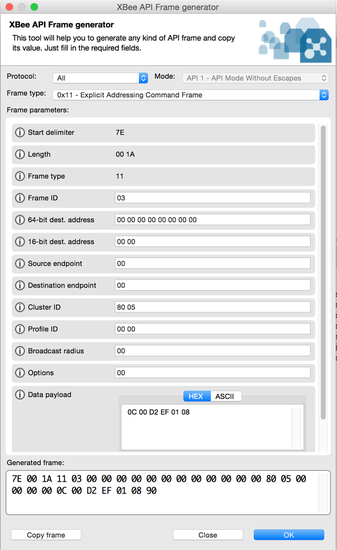
The frame needs to be set out fairly similarly.
Note the clust ID is now 80 05.
its the reply to the 00 05 command so the most significant bit is set.
The Payload we need is as follows
0C: This is the same frame ID that the hub sent out. It matches them up so it needs to be correct.
00: Status message 00=OK
D2 EF: Our 16 bit address again
01: The number of endpoints in the device. We'll keep it simple.
08: The endpoint address. I randomly chose 08.
Save it and send it.
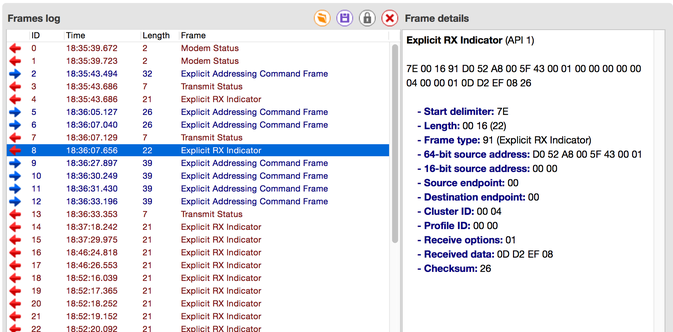
Again you will get a transmit status message and a new Request back from the hub.
(Please note, In the picture I had a transmit issue that I was too lazy to fix so I had to send the message a few times. Don't let it fool ya.)
Finding the 'Thing'
This time time we get back a Cluster ID of 00 04. This is a Simple Descriptor Request. This is our hub saying "OK I see that there is an endpoint 08, what does it do?"
We reply with a Simple Descriptor Response.. you guessed it.. set the most significant bit and get cluster ID of 80 04.
And don't forget to note the new frame ID. 0D in this case.
Time for a new frame to send.
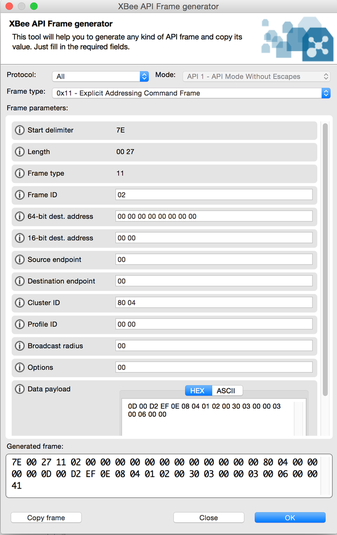
So set the cluster ID and now to the Zigbee data payload.
Note all multi byte fields are in little endian format
OD: The frame ID
00: Status OK
D2 EF: yup.. our address
0E: The number of bytes sent after this one.
08: The endpoint
04 01: 01 04 says our endpoint is Home Automation capable.
02 00: Says our device is an on/off output (keeping it simple)
30: don't worry.. version numbers.
03: The number of cluster types we can accept in.
00 00: First Cluster type - Basic
03 00: Second one is ID clusters
06 00: Last one is on/off clusters
00: The number of cluster types we send out.
Send it off.
You should get a Transmit Status back with a success notice.
Now if you look at the app you should note that you now have another 'Thing' connected to the hub.
Since we didn't have a device driver ready, it won't know what it is but it's connected.
NOTE:
When I wrote this I was on a V1 hub and this was all that was required. The V2 Hub now delves further for a better fingerprint. The hub will, at this point use the announced profile (Home Automation) clusters to extract more information.
I will continue this on the following pages..
Building the device type
Now is a good time to build a device type. In fact it would have been handy doing this first but anyway...
This device driver is VERY crude. It has some parts that need fixing even but for now it will do.
Once that is entered and published its ready for us to use.
The 'Thing' connected on the app needs to be deleted so do that.
Then start all over again.. you did save the frame list didn't you?
All that needs changing is to match the Frame ID and its a fairly simple matter to go through it all again. It should find the Xbee device driver from the fingerprint.
Making it Go
So now all we need to do is test it.
Go to the device on the app and turn it on.
You should receive another Explicit RX indicator for each time you turn it on or off.
Lets take a look.
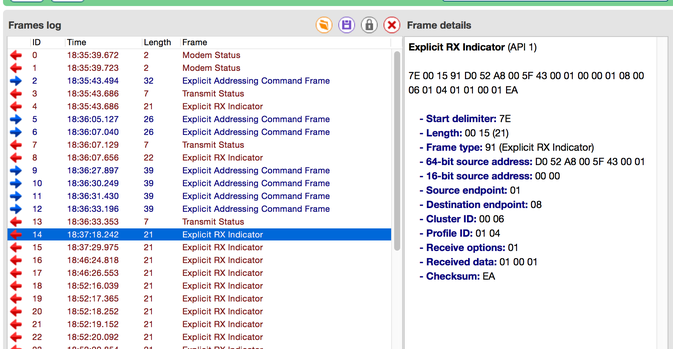
So the pertinent bits...
Cluster ID 00 06 in Profile 01 04 is a Home Automation On/Off command
Looking at the Data.
01: This is the Control frame. Its saying from Client to Server. Remember the Server is the thing that does stuff.
00: This is a frame ID.. It will count up as usual.
01: This is the sub command.. It means Turn me On. If it was 00 it means Turn me off and 02 = Toggle me.
So there it is. It can be done and it isn't too difficult.
The rest is up to you.
Further information.. XBee to SmartThings Continued..
Write a comment
geko (Saturday, 24 January 2015 03:44)
fan-freaking-tastic!
Marcio (Wednesday, 28 January 2015 04:46)
Hi, great post! Can you explain more about the "Profile 01 04 is a Home Automation On/Off command", have any list to know it?
Best regards.
George (Wednesday, 28 January 2015 11:41)
Hi Marcio.
Just read that line again.
Perhaps I'll re-word it.
Profile 0104 is the Home Automation profile.
Cluster 00 06 (when used with that profile ID ) is the on/off command.
It is listed in the Zigbee Cluster Library specification document.
I hope that is clearer.
Jaime (Wednesday, 11 February 2015 04:26)
Hi!
This is a great post, congratulations!
I have been tried following your steps, but I am not able to succesfully connect the XBee module to the hub. The XBee module didnt join the network. I load your profile and I set the parameters into the module. Then I added a "new thing" into the web and I didnt see anything in the console after the reset frame.
Could you please tell me wich parameter should I set in the Device Network Id? Do you think I am doing anything wrong?
Thanks in advance.
George (Wednesday, 11 February 2015 13:18)
Hi Jaime,
I didn't add it via the webpage.. What I do is use the cellphone app. click the + on the home screen then tap "connect new device"
this puts the hub into network discovery mode.
then reset the Xbee so it will connect.
That should then work for you.
Cheers
Maurice (Thursday, 05 March 2015 15:49)
George, Thank you so much for publishing this information. I have been able to use it to make a simple XBee S2 interface with SmartThings. I used a Maple board from DFRobot which has an XBee socket. So my code is pretty much Arduino compatible. I used the XBee library but had to extend it to support the Explicit commands. I'll publish my code once I clean it up a bit. Your message dumps were invaluable.
George (Thursday, 05 March 2015 18:28)
Thanks Maurice. I'm pleased it has been of use.
I have done much the same thing with the Xbee Ardunio library but I'm a bit too embarrassed to publish it since I've been pretty rough with it and it needs a good tidy up.
So I'll be keen to see yours.
Regards
Don (Monday, 23 October 2017 17:48)
I there someplace I can get the Xbee switch DTH code from?
Yeah I should be able to type it myself was hoping for a copy and paste evolution.
Much appreciated, Very helpful post as I was able to get my radio to connect correctly following your guide.
[email protected] (Saturday, 31 March 2018 11:58)
Hi George, you have indicated that you have dumped the Smartthings controller and dev work, Did you find a better system to do IOT?
Thanks
Trevor (Monday, 04 June 2018 13:32)
Hey,
Thanks for making this guide- super helpful!
On the next part of the guide you mention that we can download your arduino code, but I don't see a link. I would love if you could provide that!
Thanks again.
Will (Monday, 23 July 2018 17:35)
Thank you very much. I never would have gotten this far without your guide.
David (Wednesday, 03 April 2019 23:46)
I know this is no longer being maintained, but it still seems like one of the best sources of DIY ZigBee.
One thing I discovered, after much agony, SmartThings never responded to my announce until I installed a device handler.
Assuming I actually get anywhere with my project, I'll make a blog post for it myself but wanted to update here for any other (confused) folks.