
Using an Xbee to communicate with a Leviton 73A00-3ZB Wireless 30A Load Control Module.
After getting a rude shock with a power account I decided there must be a better way to take advantage of my solar power system to heat my water when I was producing power rather than just leaving it turned on. I spent some time manually turning it on and off and saved myself a lot of money but I really wanted a better way to control it.
I've got plenty of computing power on my iMac so I decided I'd start by controlling the hot water with that.
Home automation seemed a logical way to do this so I spent some time on the Internet looking for an appropriate pieces of hardware to turn my hot water cylinder on and off.
I looked at the two main mesh networks namely Z-wave and Zigbee and decided that using an Xbee to talk 'Zigbee' in a Zigbee mesh seemed like the simplest (and I use that term lightly) option.
Once I chose Zigbee I needed a switch that can also talk Zigbee.
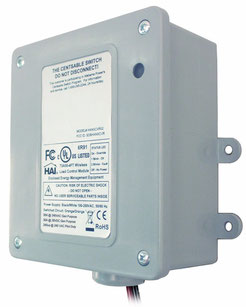
My hot water cylinder can pull up to about 25 Amps so I needed something appropriately sized. I found the Leviton 73A00-3ZB pretty much fit the bill and it was reasonably priced on Amazon so I bought one.
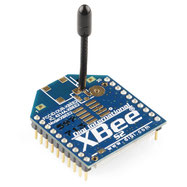
While waiting for the switch to arrive I bought an Xbee 24 ZB radio with a breakout card and cable. I downloaded the Xbee setup software, XCTU and got it talking to the radio. I had already used Arduino so I had the ports all set-up already.
I also bought a copy of "Building Wireless Sensor Networks" to read on my iPad and got reading.
The book is a great start but it's a big jump to Zigbee from there. It did give me a basic understanding though. I find it hard to jump straight into spec manuals like Zigbee at my age. It was
easier when I was younger.
Once the Load Control Module (Referred to hereafter as 'The Switch,) arrived I temporarily wired up a plug and socket to it so I could get it working.
At the end of the first day I realised I had a lot to learn. The Zigbee spec is poorly written and isn't easy to understand. At least not for me.
I eventually got it working being able to control it via XCTU. The next step is writing some Cocoa or swift to control it but for now this is how I went about making it work and some important things I've learnt. I've written this for my own benefit but I hope it's of use to some folk to help them jump ahead a bit. I'm pretty simple so I'll try to keep it like that rather than using too many abbreviations I don't understand. I am no rocket scientist.
Making a zigbee coordinator
So first up I had to make a Zigbee coordinator from an Xbee. Every Zigbee network must have exactly one.
I will assume XCTU is installed and working correctly.
Firstly, using XCTU the Xbee must be set to Zigbee coordinator API.
I found the only way the Switch would join the network was when the options were set as follows.
Stack profile: 2
PanID - anything is fine, I chose: 135B
Node identifier (NI) - again anything will do but I set it to: XBEE-COORD
EE ( Encription enabled) set to: 1
EO ( Encription options) set to: 1

The Xbee setup in XCTU.

After setting these options, when I turned the switch on it joined the network which was indicated by a short blink every second on the switch light.
First step complete. A fairly simple step but all success is pleasing and it took me a while to get the settings right.
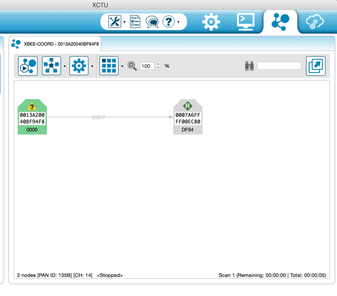
The next step is to figure out how to address the switch. I could have done it the more correct and complex way of sending the appropriate commands but instead I just used the Network Working Mode of XCTU and used the Scan radio network to find the 64 & 16 bit addresses to save time.
Once I got the addresses I wrote them down. Putting a sticker on the switch with the 64 bit address on wouldn't be a bad idea either. I haven't done it yet.
So that's the really easy stuff out of the way.
Next I needed to start sending commands to get the info I Required.
The first one was fairly simple because it only gets sent to the Xbee.
In order to send Zigbee frames to devices you must use the Explicit addressing commands of the Xbee and in order to receive them correctly you must set AO to 1.
So that's the first command that gets sent to the Xbee.
If you want to do this, go into XCTU console mode, make sure you push the serial connect button
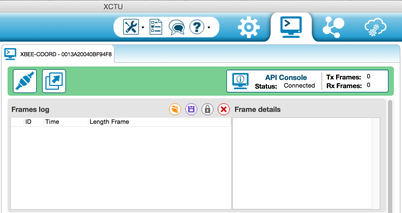
The next step is to add a new frame to send in the transmit section section and create it using the frame generation tool.
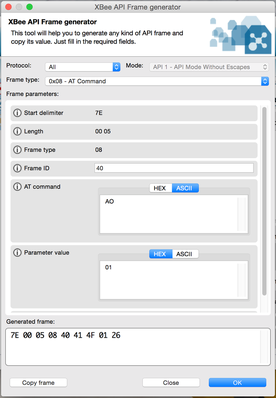
Now we build a simple AT command frame to tell the Xbee to set AO to 1 to allow the explicit receive commands to pass correctly.
Note the AT command is selected in ASCII to make things easier.
You can then name the frame, so you can remember what it does, and save it.
Now send it to the Xbee. You should get a response back from the Xbee with an OK status. (OK is status code 00 in Hex)
Talking Zigbee
The next thing I learned was that each gadget on a Zigbee network can contain many 'end points'. Each endpoint is a Zigbee 'device'. For instance a light dimmer unit might contain one end point that is an on/off switch and another end point that is a Level Control that says how bright to shine the light.
The Zigbee protocol uses several 'discovery' commands in order for a device to reveal itself and its capabilities. So the idea is that these discovery commands are used to find each end point, how to address it and what it does.
So that was the next thing I needed to do so that I could find out how to address the on/off switch endpoint of the switch unit.
A bit confusing but hopefully that makes sense.
The discovery commands are part of the underlying base Zigbee protocol, known confusingly as Zigbee Device Objects or ZDO. None of the commands (known as clusters) in the ZDO need to set a profile ID (such as the Home Automation profile). Since the base protocol (ZDO) applies to all of the profiles, the profile ID setting is set to 0x0000.
Active Endpoint Discovery
The command we need to send is called the Active Endpoints Request command. This will tell the device to report all of the endpoints within it.
Lets create another frame. Since its Zigbee we need the Explicit addressing frame.
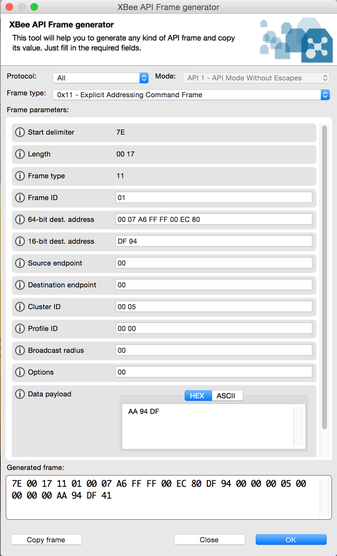
The 64 and 16 bit addresses are those of the switch. We found these above.
We are talking to the base protocol so the endpoints are left at zero.
The cluster ID is that of the Command we are sending. Active Endpoint Request is 0x0005.
Profile ID is the ZDO so its 0x0000.
The data payload is the zigbee frame as follows.
Firstly a frame sequence number, I've used AA here. anything is fine.
94 DF is the 16 bit address of the unit we are querying but its in little endian format, i.e. least significant byte first.
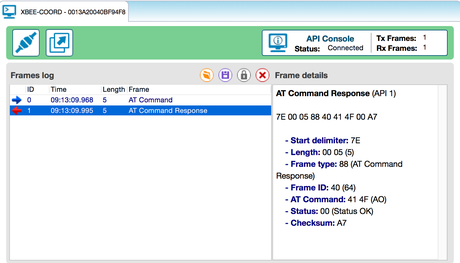
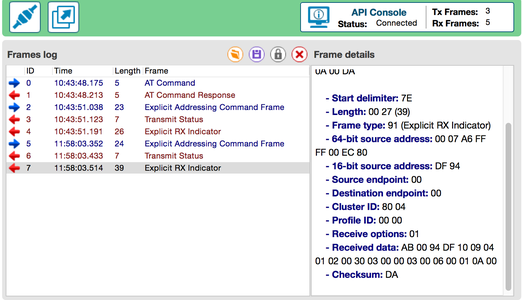
After sending this command you will receive a response from the switch with a Zigbee Active Endpoints Response cluster in the Data Received field.

Looking at this data we can break it down as follows.
Cluster ID 80 05 is the Active Endpoints Response cluster, so that’s what we are expecting.
The data Is
AA - This is a match to the frame sequence number we used to send the request so we can be sure its a response to our specific request.
00 - This is the Status. 00 means Success. Great!
94 DF - This is the 16 bit address again in little endian format.
03 - The count of how many endpoints the unit has.
0E - the first end point
0C - the second end point
09 - the last endpoint
Great.. we're a bit further along. Write info this down!
Simple Descriptor Request
Now that we have the end points revealed we need to find out which one is the on/off switch endpoint. The other endpoints are of interest too in order to get full functionality but this is a good starting point.
In order to figure this out we need to use the Simple Descriptor Request command (Cluster ID 0x0004).
This request will return information as to which Zigbee profile the endpoint will work on and which commands it will accept. From there it is deduced what it is.
So lets build another frame to get this information.
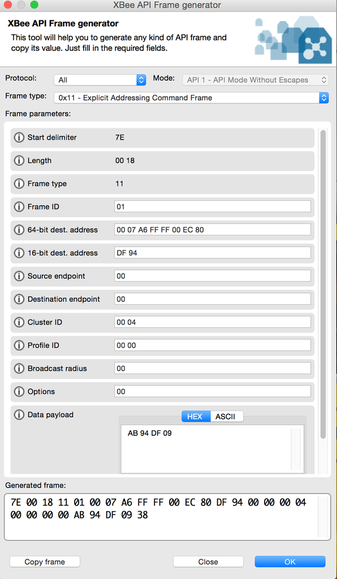
The addresses follow the same tune as before.
We are talking to the ZDO in the unit so the endpoints stay zero.
The Cluster ID is now that of the Simple Descriptor Request command, 0x0004
Now to the Zigbee frame. Its fairly similar to before but very slightly different.
AB - the frame sequence number
94 DF - The 16 bit address of the unit in little endian format
09 - The endpoint we are querying. There are three endpoints in the unit that we know of but lets start here.
We would do this for each endpoint.
Send the command and lets look at what comes back.
Lets break down the response.
Cluster 80 04 is the simple descriptor response so that’s good.
AB - The match for the sequence number sent
00 - Status - OK
94 DF - The unit’s address, good.
10 - the number of bytes returned after this byte, 16 decimal.. count 'em.
09 - The endpoint we are talking to.
04 01 - The profile ID in little endian = 0104 = Home Automation profile
02 00 - Device ID = 00 02 = On/Off Output device - Woohoo!
nibble 3 = Device version
nibble 0 = reserved
03 - The number of input clusters accepted
00 00 = First input cluster accepted = 0000 = Basic commands
03 00 = 0003 Cluster accepted = ID Commands
06 00 = 0006 Cluster accepted = on/off commands - This is what we are looking for!
01 = the number of output clusters
0A 00 = 000A output cluster sent =Time cluster.
We can look at the other end points but for now we only want the on/off cluster so now we now know its on endpoint 09.
Lets get switching !
Now we are getting down to making the switch turn on and off.
In order to do this we need to turn to the appropriate profile ID as indicated in the endpoint discovery. In this case it was profile 0104 which refers to the Home Automation Profile. As such, the Zigbee frames now change format in order to communicate with the profile. There seems to be a bit of recycling of terms with this stuff but basically its an application layer.
You will set this by setting the profile ID field in the Xbee explicit addressing command is set to 01 04. (Home Automation Profile)
Looking through the Zigbee Cluster library spec can be very confusing especially given than information is given in transmission order. the first thing that had me stumped for a whiles was the fact that the first byte sent has various important bits that must be set. The problem was that the byte is shown back to front to what makes sense to me. it took a few days to twig to this but now I’ve got it sorted out I think.
One major hurdle for me was the Frame Control Field. This is sent at the beginning of all ZCL frames. It took me a long time to notice that the bit order of the byte shown in the spec is displayed in send order not in logical order. So I re-wrote the description for my own benefit to put the bits in a more logical order.
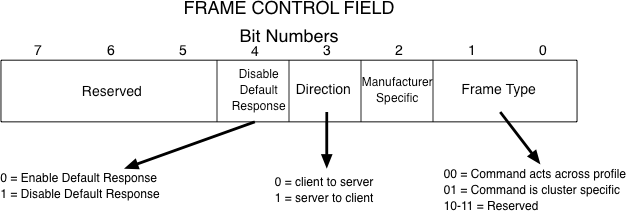
The important thing for this command is that the on/off command is cluster specific so the correct bit (bit 0) needs to be set.(i.e. frame control field = 01)
I can promise you that if you set bit 6 instead (as I was inclined to do looking at the spec) it won't work!
Another point, the 'server' is the thing doing what you want it to do. In this case it is the switch. It isn't the coordinator. So the direction control bit in set to 0
Lets build the On/Off frame.
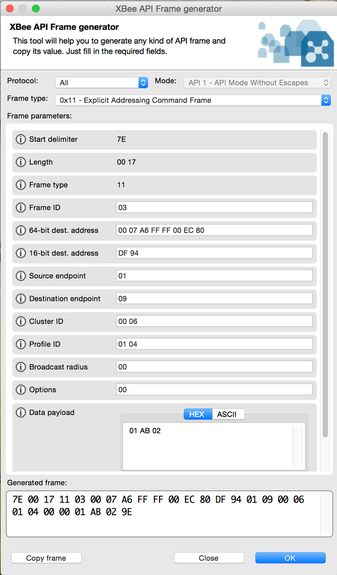
The 64 and 16 bit addresses are the same as before
Source endpoint: Now we don’t want the base so lets use 01 .. Anything 01 to FE is OK
Destination endpoint: set to the endpoint receiving cluster 0x0006 (on/off) in this case 09
Cluster ID: 00 06
Profile ID 01 04 (home automation)
Now for the Zigbee frame in the payload 01 AB 02
01 - The Frame Control byte
AB - a sequence number.. whatever you like
02 - The on/off sub- command.
Possible commands are:
-
00 = off
-
01 = on
-
02 = toggle
Send that command to the Switch. You should hear it click.
You will receive a response.

The received data is a default response frame. This can be turned off in the Frame Control Byte if you don’t want it.
18 = Frame Control byte. Direction: from server, Don't send default response.
AB - Sequence Number match to ours
0B - Default Response Identifier
02 - The command we sent
00 - status - OK.
So there it is. I’ve got a lot more to do but that’s a start. I now need to write some code to control this.
I don't profess that my understanding is 100% accurate but it is enough to make things work.
I hope that’s of some use to somebody. I spent about five days figuring this stuff out. I told you I wasn’t a rocket scientist.
Write a comment